Create Your Own Sentienta-Based Application

Sentienta is a platform for building custom GenAI applications with structured, multi-agent reasoning. In this post, we walk through how to use Sentienta’s APIs to define agent roles, initiate a collaborative thinking process, and extract structured, explainable decisions.
You’ll see how to construct a team of reasoning agents, set up their dialog cycles, and manage the reflective output—complete with code examples. For deeper context on how Recursive Reasoning supports coherence and value alignment, check out these posts (here and here). Today, the focus is practical: how to build your own deliberative AI, step by step.
Why Build Your Own Application?
Prebuilt AI tools often assume a single general-purpose use case. But high-friction domains like compliance oversight, clinical decision support, or ethics triage require applications tailored to specific policies, workflows, and trust requirements. Building your own application gives you control over behavior, oversight logic, and how responses are generated, reviewed, and stored.
With Sentienta, you can specify how agents think, not just what they say. That makes it possible to design solutions that reflect your institutional values, follow internal processes, and produce outputs that stand up to audit or review. Instead of adapting your use case to fit a generic product, you shape the application to reflect how your organization reasons.
Basic Steps to Create a Sentienta-Enabled Webapp
Building your own Sentienta-powered web application begins with designing the agent team, then wiring a lightweight frontend to communicate with it. Here’s how to get started:
1. Design and Test Your Agents
Start in Sentienta’s platform by configuring the agents your application needs. You can define a team for your agents, the individual agent personas, and test team interactions. (See Tips and Tricks and Team Dynamics for background) Or just use the Quick Start to create the team for you (recommended).
2. Build the Web Interface
The frontend can be written in plain HTML and JavaScript – no framework required. This keeps the integration minimal and easy to deploy.
3. Authenticate Using Your API Key
You can implement a complete login capability in your application, and we will discuss this in more detail in a future post, but perhaps the easiest way to authenticate your webapp is to create an application-specific key from your Sentienta account.
Visit the Agent Studio section of the documentation to create a project and generate an authentication key specific to your app. This key authorizes your web client to access your configured agent team.
Then in your webapp’s main page insert the following code:

Be sure to fill in the key you created and the domain of your webapp (you needed that to create a key). Then fill in your team team and the list of agents you created for this app.
Your webapp will need to know the access endpoints that Sentienta exposes. So include these in your javascript file that will be accessing the APIs:
![]()
Finally, to complete the initialization, get a token using your ownerKey with your first call to Sentienta:
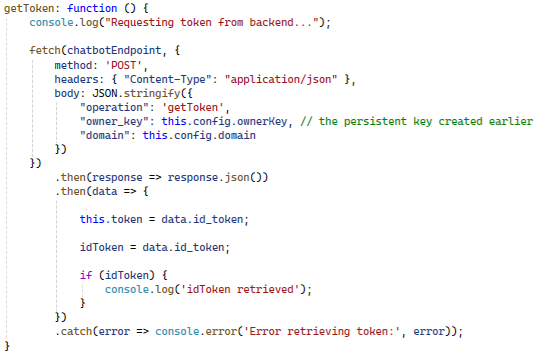
You will use this token in all subsequent calls to Sentienta. It authenticates your application for those API calls.
4. Send Queries to the Agent Team
Set up your frontend to send user inputs as POST requests to the API endpoint associated with your team. Each message is passed to your agent team for deliberation and analysis. Here is how you submit a query to your team:
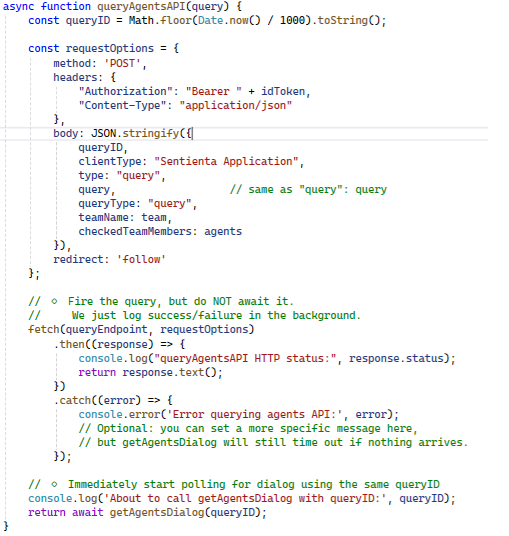
You supply the idToken for authentication, and a queryID which is just an index to assign to the dialog so when you query for the results, Sentienta will know which dialog you want. The teamName is the team that you want to query, and the agents is a string of comma-separated agent names that you assigned to the team.
Although your Sentienta.init() call initiated with a specific list of agents and team, you can alter this at query time to limit the agents being called, or address a different team.
You can see from this code that the query is simply fired-off, but the actual results of the query are retrieved with a call to getAgentsDialog, discussed next.
5. Receive Responses from the Team
The server returns structured outputs, capturing not only the final response but also insights from the team’s reasoning process. You can use this to render explanations, examine individual agent responses to a query, and orchestrate your application using the agent responses.
Sentienta is different from most chat applications because its agents interact with each other and the team dialog is central to what it produces. In order to access this dialog, the data is retrieved iteratively, in a loop:


The function fetchData is where the retrieveEndpoint is actually called. You supply your authentication token, the queryID that identifies the dialog and a dialogIndex that increments over the agent responses. The dialogIndex is incremented on the server-side but it passed back to the client-side for convenience.
Response data is in response.body, and is structured strings. You can write your own handler handleSentientaResponse that will use the data in that string to decide how to display or use the responses in your application.
The while-loop in getAgentsDialog will continue for a fixed count, but can be terminated early should an ‘EOD‘ token appear in the response.
That’s all that is needed to get started building a webapp powered by teams of agents.
Conclusion: Build What Your Workload Demands
Sentienta gives you the tools to design custom agents, assemble them into reasoning teams, and deploy applications that use them effectively. Integration is simple: request an authentication token, send queries, receive structured reasoning. By building your own application, you align AI behavior with your business logic—at the scale and sensitivity your domain requires.
